How to: Seafoam Induction Procedure
#1
 08-21-2010, 10:43 PM


http://www.landroverclubvi.com/seafoam-procedure.html
What you will need:
1. Two cans of Seafoam.
2. Two feet of clear vacuum line (don't remember the size)
3. Throttle body cleaner. (enough to get the job done)
4. Shop towels
5. Pliers

1. Identify the black plug between the rubber crank case vent tube on the left, and the vacuum line on the right.

2. Remove the plug. Make sure you replace with a new one if yours is dry or too loose no longer having a snug fit.
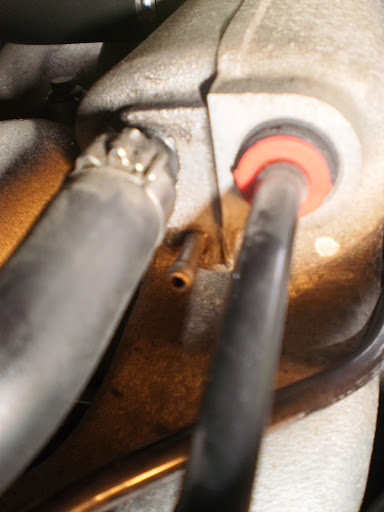
3. Attach the clear vacuum line.

4. Open one can of seafoam and have a helper turn the engine on. Using pliers pinch the line and insert in bottle.
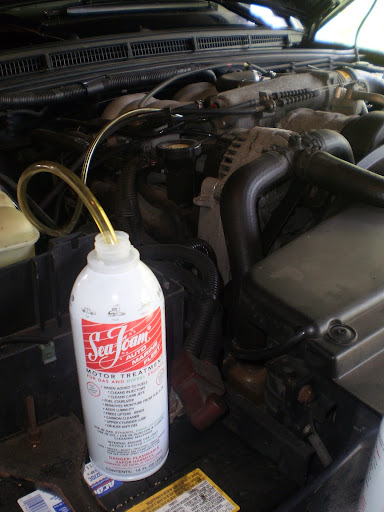
5. Time to suck in seafoam. Control the intake of the fluid to last one minute. You can regulate it without pliers by placing the end of the line just above the surface of the fluid. Remember not to let it last too long or it will start to smog the neighborhood before time. Turn engine off immediately after can is dry.

6. After you are done with the step 5, wait at least 30 min before starting it up again. During your 30 min break, grab your second can and pour it in the gas tank.

7. Then go up front and clean the throttle body to look from this
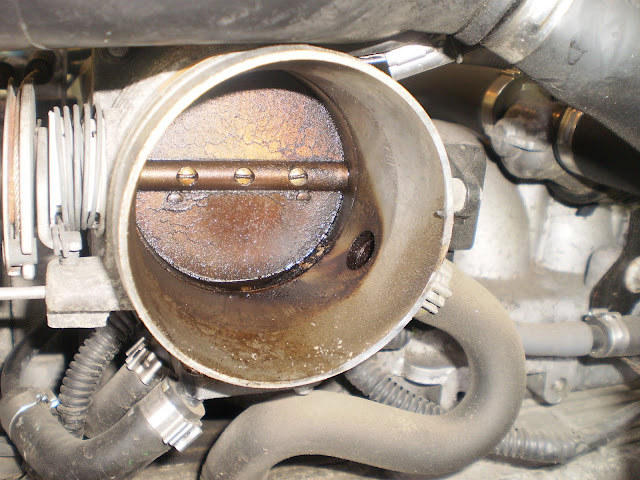
to this

8. After the 30 min, the throttle body clean, and that second can going into the gas tank, go for a ride! This is what you will see in the rear view mirror.


Other drivers will look at you and wonder why it is smoking so much. Just smile and wave. They will never understand.
What you will need:
1. Two cans of Seafoam.
2. Two feet of clear vacuum line (don't remember the size)
3. Throttle body cleaner. (enough to get the job done)
4. Shop towels
5. Pliers
1. Identify the black plug between the rubber crank case vent tube on the left, and the vacuum line on the right.
2. Remove the plug. Make sure you replace with a new one if yours is dry or too loose no longer having a snug fit.
3. Attach the clear vacuum line.
4. Open one can of seafoam and have a helper turn the engine on. Using pliers pinch the line and insert in bottle.
5. Time to suck in seafoam. Control the intake of the fluid to last one minute. You can regulate it without pliers by placing the end of the line just above the surface of the fluid. Remember not to let it last too long or it will start to smog the neighborhood before time. Turn engine off immediately after can is dry.
6. After you are done with the step 5, wait at least 30 min before starting it up again. During your 30 min break, grab your second can and pour it in the gas tank.
7. Then go up front and clean the throttle body to look from this
to this
8. After the 30 min, the throttle body clean, and that second can going into the gas tank, go for a ride! This is what you will see in the rear view mirror.
Other drivers will look at you and wonder why it is smoking so much. Just smile and wave. They will never understand.
#2
08-21-2010, 11:40 PM

TReK
GREAT Write up!
We really needed this, much easier to do with pics.
Just a quick tip: Bring the empty can of seafoam with you when you go for the drive just in case you get pulled over. Some cops will pull you over for excessive smoke and having the can should help them understand the reasoning.
We really needed this, much easier to do with pics.
Just a quick tip: Bring the empty can of seafoam with you when you go for the drive just in case you get pulled over. Some cops will pull you over for excessive smoke and having the can should help them understand the reasoning.
#3
08-22-2010, 12:21 AM

Pro Wrench
good write up but I just dont understand where people get their expertise on this stuff. Like how fast to pour it in, [I do mine up to the point before it stalls]
And how long to wait. And weather or not it actually works. People believe the smoke is the gunk being burnt off. Well I just cleaned my entire upper engine, and I bet I would get a tone of smoke if I did it too.
I use the stuff because I too fall for stuff plus a prayer that it does something plus its fun, and I think your writeup is great, too many people ask how to do such a simple thing.
#4
08-22-2010, 07:47 AM
good write up but I just dont understand where people get their expertise on this stuff. Like how fast to pour it in, [I do mine up to the point before it stalls]
And how long to wait. And weather or not it actually works. People believe the smoke is the gunk being burnt off. Well I just cleaned my entire upper engine, and I bet I would get a tone of smoke if I did it too.
I use the stuff because I too fall for stuff plus a prayer that it does something plus its fun, and I think your writeup is great, too many people ask how to do such a simple thing.
And how long to wait. And weather or not it actually works. People believe the smoke is the gunk being burnt off. Well I just cleaned my entire upper engine, and I bet I would get a tone of smoke if I did it too.
I use the stuff because I too fall for stuff plus a prayer that it does something plus its fun, and I think your writeup is great, too many people ask how to do such a simple thing.
That is why i wrote the procedure and didn't add anything as to WHY to do it. You are right about how how FAST to let it in and how LONG to let it wait No one really knows, lol. That is why I made the thread. We can now discuss those two variables and address what kind of results others have had doing it different ways.
The way I described is the method a prominent forum member suggested way back when. I have done it for many other rovers to include several DII's, DI's, RRC,. I have done it about 20 different times on 20 of those different vehicles with improvement during idle, better throttle, etc.
I'm open for trying it different ways.
#5
08-22-2010, 11:22 AM
TReK

#7
08-22-2010, 04:52 PM
Pro Wrench
Other thing is how do you know your doing it correctly? And ontop of that how can you tell which way is best or if it even works?
I did 2 maybe three cans, over about 3 months and took apart my engine and let me tell you..
1 It was nothing pretty
2 There aint no way anything like this will remove the crud from your valves [not saying it should] soaking in gas barely did anything and the only thing that budges it is a wire wheel.
That said I still use it and will continue to. And I have no clue why.
#8
08-22-2010, 05:28 PM
#9
08-22-2010, 05:32 PM
Other thing is how do you know your doing it correctly? And ontop of that how can you tell which way is best or if it even works?
I did 2 maybe three cans, over about 3 months and took apart my engine and let me tell you..
1 It was nothing pretty
2 There aint no way anything like this will remove the crud from your valves [not saying it should] soaking in gas barely did anything and the only thing that budges it is a wire wheel.
That said I still use it and will continue to. And I have no clue why.
I did 2 maybe three cans, over about 3 months and took apart my engine and let me tell you..
1 It was nothing pretty
2 There aint no way anything like this will remove the crud from your valves [not saying it should] soaking in gas barely did anything and the only thing that budges it is a wire wheel.
That said I still use it and will continue to. And I have no clue why.
Anyway. I will gladly say that this procedure won't make engine internals look brand new. But if I get NOTICEABLE results that I can hear and feel, then SOMETHING is working.
=)
#10
08-23-2010, 12:23 AM

I did the Seafoam. About 2 1/2 cans in about 2 weeks. Then followed it up by the BG 44k. The BG gave me the most lasting results as in snappy horse power. Especially while you drive it out on the half tank. I'm not saying SeaFoam isnt good. But BG is definitely better. But it is less available to the average consumer. And runs about $20 a can comparted to SeaFoam at $8 per can. I use BG44k every 3 oil changes now or 15k.
As far as cleaing out the inside ports of your upper & lower intake manifolds. Well I tore apart a 2004 engine with only 37k on it. It was all greasy in the top and lower manifolds. I think thats just the way our older style engines are. Who know the previous owners ever did a intake cleaning or used premium?
As far as cleaing out the inside ports of your upper & lower intake manifolds. Well I tore apart a 2004 engine with only 37k on it. It was all greasy in the top and lower manifolds. I think thats just the way our older style engines are. Who know the previous owners ever did a intake cleaning or used premium?

